Candle Cookbook
🚀 The Mission:
Democratize access to state of the art AI models.
🌏 The Principles:
🫱🏾🫲🏼 Trust ~ ethically sourced data and end-to-end transparency.
🔒 Privacy ~ secure, on-device inference without data sharing.
🌱 Sustainability ~ optimize efficiency to minimize our carbon footprint.
🕯️ Start Here
Welcome! Get familiar with Candle Cookbook by going through some of our favourite introductory tutorials
We also recommend getting familiar with the Official Candle framework and User Guide
🌱 Contributing
We welcome contributions from anyone who aligns with Our Mission and Our Principles.
To get started as a contributor:
- Read our Code of Conduct
- Read the Contributor Guidelines
- Install Candle Cookbook according to the Developer Setup guide
🍳 The Recipes:
Minimum requirements for GPU targetted binaries
For CUDA enabled builds using --features cuda:
- NVIDIA GPU with CUDA compute capabilitity > X.X
- CUDA Toolkit >= X.X
For cuDNN optimized builds using --features cuda, cudnn:
- NVIDIA GPU with CUDA compute capabilitity > X.X
- CUDA Toolkit >= X.X
- cuDNN >= X.X
Verify CUDA/cuDNN:
# Verify CUDA
nvidia-smi --query-gpu=compute_cap --format=csv
nvcc --version

# Verify cuDNN
whereis cudnn.h
⚠️ IMPORTANT:
AWS/Azure builds may incur charges. It is your responsibility to understand the associated resource costs. Please review the useage rates accordingly, as we are not liable for any charges incurred from the utilization of these platforms/services.
🛣️ Roadmap
Our goal is to document each stage of a fully transparent LLM development cycle
- Publish MVP Candle Cookbook
- Ethically source and construct an openly available LLM dataset
- Build a Candle-based LLM from scratch
- Customize LLM with finetuning
- CI/CD deployment of LLM
🧑🍳 Our Team:
Get to know our Community Leaders
Local Builds
Requirements
Minimum requirements for GPU targetted binaries
For CUDA enabled builds using --features cuda:
- NVIDIA GPU with CUDA compute capabilitity > X.X
- CUDA Toolkit >= X.X
For cuDNN optimized builds using --features cuda, cudnn:
- NVIDIA GPU with CUDA compute capabilitity > X.X
- CUDA Toolkit >= X.X
- cuDNN >= X.X
Verify CUDA/cuDNN:
# Verify CUDA
nvidia-smi --query-gpu=compute_cap --format=csv
nvcc --version

# Verify cuDNN
whereis cudnn.h
Recipes
Getting Started
- Hello, Candle! ~ start here
Hello, Candle!
Install Rust via rustup
curl --proto '=https' --tlsv1.2 -sSf https://sh.rustup.rs | sh -s -- -y --profile minimal --default-toolchain stable

# Set path
source "$HOME/.cargo/env"
Configure Candle
git clone https://github.com/huggingface/candle.git
cd candle
Build & Run Binaries
See all Candle example models here
Example:
# CPU build
cargo build --example falcon --release

# CUDA + cuDNN build
cargo build --example falcon --features cuda,cudnn --release

# Run binary
cd target/release/examples
./falcon --prompt "who invented the lightbulb"
AWS Builds
Requirements
Recipes
Getting Started
- Hello, Candle on AWS! ~ Hello, Candle! on AWS EC2 + S3
- AWS Candle CLI ~ Developer workflows using the Candle CLI for AWS
CI/CD Pipelines
- CodePipeline + Jenkins Build ~ automated binary builds on EC2 with Jenkins + CodePipeline
Hello, Candle on AWS!
Prerequisites
Create Candle-EC2 IAM User
From AWS IAM Console >> Users >> Create User "Candle-EC2" >> Attach Policies Directly:
AmazonS3FullAccess
Launch GPU Enabled AWS EC2 Compute Instance
- Open the AWS EC2 Console
- Configure a Ubuntu 20.04 Deep Learning Base GPU AMI image + G5.##xlarge instance type (see here for charges and instance capcity)
- Create new key pair and save .pem file
- Allow SSH traffic
- Launch Instance
- From EC2 landing page >> Start Instance
Gotchas
- You may need to request capacity increase from AWS to handle larger G5.##xlarge instances
- Move .pem file from downloads to ~/.ssh using
mv ~/Downloads/candle-key.pem ~/.ssh
Connect to EC2 via SSH
- Install Remote - SSH from VSCode Extensions
- Add new SSH Connection
- From EC2 landing page >> Connect >> SSH client >> Copy commands to VSCode
# NB: edit path to .pem file as needed
chmod 400 ~/.ssh/candle-key.pem
ssh -i "~/.ssh/candle-key.pem" ubuntu@ec2-##-##.us-east-1.compute.amazonaws.com
- Update .config file and validate format as follows
Host ec2-##-###.us-east-1.compute.amazonaws.com
  HostName ec2-##-###.us-east-1.compute.amazonaws.com
  IdentityFile ~/.ssh/candle-key.pem
  User ubuntu
- Confirm remote host platform (Linux) and fingerprint (Continue)
- Launch terminal on remote host
Gotchas
- If you stop and restart your EC2 instance, you will need to update the IP address in your .config file
Verify EC2 CUDA/cuDNN
nvidia-smi --query-gpu=compute_cap --format=csv
nvcc --version

whereis cudnn.h
Install Rust via rustup
curl --proto '=https' --tlsv1.2 -sSf https://sh.rustup.rs | sh -s -- -y --profile minimal --default-toolchain stable

# Set path
source "$HOME/.cargo/env"
Install AWS CLI
curl "https://awscli.amazonaws.com/awscli-exe-linux-x86_64.zip" -o "awscliv2.zip"
unzip awscliv2.zip
sudo ./aws/install

# Check install
aws --version
Configure Candle-EC2 IAM User
- IAM Console >> Users >> Candle-EC2 >> Security Credentials >> Create Access Key "EC2-CLI"
- From EC2 SSH terminal
aws configure
# Copy-Paste Candle-EC2 Access Key ID
# Copy-Paste Candle-EC2 Secret Access Key
# Default region name: us-east-1
Configure Candle
git clone https://github.com/huggingface/candle.git
cd candle
Build & Run Binaries
See all Candle example models here
Example:
# CPU build
cargo build --example falcon --release

# CUDA + cuDNN build
cargo build --example falcon --features cuda,cudnn --release

# Run binary
cd target/release/examples
./falcon --prompt "who invented the lightbulb"
Store Binaries in S3
From AWS S3 Console >> Create S3 Bucket i.e my-candle-binaries
# Copy model binary from EC2 to S3
cd target/release/examples
aws s3 cp quantized s3://my-candle-binaries
⚠️ IMPORTANT: Terminate any AWS resources to prevent unexpected charges.
Automate Binary Builds with Jenkins + CodePipeline
Prerequisites
- Complete the Hello, Candle! on AWS tutorial to setup your EC2 Instance, S3 Bucket and Candle-EC2 IAM User.
- A Github Account
- An AWS Account
Add Permissions to Candle-EC2 IAM Role
- From AWS IAM Console >> Users >> Candle-EC2 >> Add permissions >> Attach existing policies directly
- Add
AWSCodePipelineCustomActionAccesspolicy >> Save changes
Integrate Jenkins with CodePipeline
Add Security Group to EC2
- From EC2 landing page >> Network & Security >> Security Groups
- Create Security Group >> Name: "WebConnectEC2" >> Description: "Allow SSH and HTTP traffic to EC2"
- Add the following inbound rules. NB: Source = "Anywhere" is not recommended for production environments.
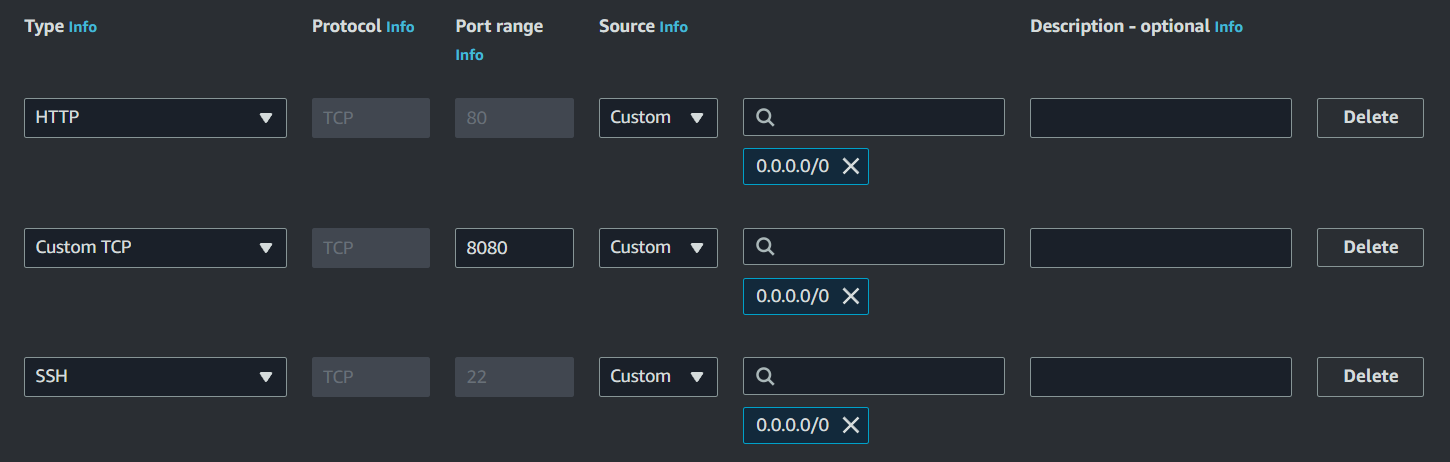
- Click EC2 instance >> Actions >> Networking >> Change Security Groups >> Select "WebConnectEC2" >> Save
Install Jenkins on EC2
# Get Jenkins files
curl -fsSL https://pkg.jenkins.io/debian-stable/jenkins.io-2023.key | sudo tee \
  /usr/share/keyrings/jenkins-keyring.asc > /dev/null
echo deb [signed-by=/usr/share/keyrings/jenkins-keyring.asc] \
  https://pkg.jenkins.io/debian-stable binary/ | sudo tee \
  /etc/apt/sources.list.d/jenkins.list > /dev/null

# Install Jenkins
sudo apt-get update \
  &&
sudo apt-get install jenkins

# Check install
jenkins --version

# Allow Jenkins service to start at boot
sudo systemctl enable jenkins

# Launch Jenkins
sudo systemctl start jenkins
Create Jenkins Admin/Login to Jenkins
- Click EC2 instance >> Details >> Copy EC2 Public IPv4 DNS
- From browser navigate to http://<EC2_public_ipv4_address>:8080/
- From EC2 SSH terminal >>
sudo cat /var/lib/jenkins/secrets/initialAdminPassword>> Copy password - Paste password into Jenkins >> Continue >> Install suggested plugins
- Create admin user (suggested username: admin) >> Save and Continue
- Instance Configuration >> Not Now
Gotchas
To clean install Jenkins
sudo apt-get remove --purge jenkins
rm -rf /var/lib/jenkins
Create Jenkins Build Project
- From Jenkins dashboard >> New Item >> Enter item name: "CandlePipeline" >> Select "Freestyle project" >> OK
- General >> Check "Execute concurrent builds if necessary"
- Source Code Management >> Check AWS CodePipeline
- From AWS IAM >> Users >> Candle-EC2 >> create second access key "Jenkins" >> Add to Jenkins Build AWS Config
- Category >> Build
- Provider: Jenkins
- Build Triggers >> Check "Poll SCM" >> Schedule: * * * * *
- Build Steps >> Add build step >> Execute shell >> Add command:
ls
export PATH=/usr/local/cuda-11.8/bin:$PATH
export PATH=/home/ubuntu/.cargo/bin:$PATH
. "/home/ubuntu/.cargo/env"
rustc --version
cargo --version
nvcc --version
whereis cudnn.h
nvidia-smi
cargo build --example quantized --features cuda,cudnn --release
cargo build --example falcon --features cuda,cudnn --release
- Post-build Actions >> Add post-build action >> AWS CodePipeline Publisher
- Output location >> Add >> Artifact Location: /target/release/examples >> Artifact Name: BuildArtifact
Create CodePipeline Project
- AWS CodePipeline Console >> Create pipeline >> Pipeline name: "CandlePipeline" >> Check "New service role"
- Advanced Settings >> Custom location >> Bucket: "my-candle-binaries" >> Default AWS Managed Key >> Next
- Source provider >> Github (Version 2) >> Follow instructions to create Github Connection
- Uncheck "Start the pipeline on source code change"
- Repository name: huggingface/candle >> Branch Name: main >> Output artifact format:CodePipeline Default >> Next
- Build Provider >> Add Jenkins
- Provider Name: Jenkins NB: Must match Jenkins Build Project!
- Server URL: http://<EC2_public_ipv4_address>:8080/
- Project Name: CandlePipeline NB: Must match Jenkins Build Project! >> Next
- Skip deploy stage >> Skip
- Review >> Create pipeline
- The first build will run automatically. Subsequent builds can be triggered using "Release change" button.
Download Binaries
- AWS S3 Console >> my-candle-binaries >> CandlePipeline/ >> BuildArtif/
- Order by "Last modified" >> Download latest zip
⚠️ IMPORTANT: Terminate any AWS resources to prevent unexpected charges.
References
Developer Workflows using the Candle CLI for AWS
The Candle CLI tool offers a simple interface to support Candle Cookbook development workflows seamlessly across AWS resources.
Prerequisites
- Complete the Hello, Candle! on AWS tutorial to setup your EC2 Instance, S3 Bucket and Candle-EC2 IAM User.
- Optional: Complete the Jenkins + CodePipeline tutorial to setup automated EC2 and S3 builds
- A Github Account
- An AWS Account
CLI Setup
-
Download Candle CLI for AWS by clicking the "Download Latest" README badge or the latest release source code.
-
Per the AWS Candle CLI Setup Instructions
- Create an AWS IAM User Policy "Candle-Cli" with
AmazonS3FullAccessandAmazonEC2FullAccesspermissions - Create an access key for your "Candle-Cli" user
- Create an AWS IAM User Policy "Candle-Cli" with
-
Add a
.envfile and configure with AWS credentials and EC2 Key Pair# $touch .env AWS_ACCESS_KEY_ID=<YOUR_ACCESS_KEY> AWS_SECRET_ACCESS_KEY=<YOUR_ACCESS_SECRET> AWS_DEFAULT_REGION=<YOUR_AWS_REGION> EC2_KEY=PATH/TO/EC2_KEY_PAIR.pem
Using the Candle CLI to connect to your EC2 Instance
# List your EC2 instances
$ cargo run list --ec2

# Connect to EC2
$ cargo run instance --id <INSTANCE_ID> --action start
$ cargo run connect --id <INSTANCE_ID>

# Check AWS CLI is installed on your EC2
ubuntu@ip$ aws --version

# If not: install AWS CLI
ubuntu@ip$ curl "https://awscli.amazonaws.com/awscli-exe-linux-x86_64.zip" -o "awscliv2.zip"
ubuntu@ip$ unzip awscliv2.zip
ubuntu@ip$ sudo ./aws/install
ubuntu@ip$ rm -r awscliv2.zip

# Confirm install
ubuntu@ip$ aws --version
Sample Workflows
- Run Prebuilt Binaries on EC2
- Build Binaries on EC2 + S3 Storage
- Move Jenkins + Codepipeline binaries to EC2
Run Prebuilt Binaries on EC2
See available prebuilt binaries here
⚠️ IMPORTANT: Ensure you choose binaries compatible with your EC2 instance architecture
# Connect to EC2
$ cargo run instance --id <INSTANCE_ID> --action start
$ cargo run connect --id <INSTANCE_ID>

# Download binary
ubuntu@ip$ wget -O mistral-cudnn https://github.com/athletedecoded/cookbook-binaries/raw/main/binaries/cudnn/mistral?download=

# Set EC2 execution permissions
ubuntu@ip$ chmod +x mistral-cudnn

# Run binary
ubuntu@ip$ ./mistral-cudnn --prompt "who invented the lightbulb"

# Close SSH tunnel
ubuntu@ip$ exit

# Stop your EC2 instance to avoid charges
$ cargo run instance --id <INSTANCE_ID> --action stop
Build Binaries on EC2 + S3 Storage
See available Candle models here
# List your EC2 instances
$ cargo run list --ec2

# Connect to EC2
$ cargo run instance --id <INSTANCE_ID> --action start
$ cargo run connect --id <INSTANCE_ID>

# If Candle repo is not on your EC2
ubuntu@ip$ git clone https://github.com/huggingface/candle.git

# Fetch latest candle repo
ubuntu@ip$ cd candle
ubuntu@ip$ git fetch upstream main

# For CPU build (ex. quantized model)
ubuntu@ip$ cargo build --example quantized --release

# For CUDA + cuDNN build (ex. falcon model)
ubuntu@ip$ cargo build --example falcon --features cuda,cudnn --release

# Run models on EC2
ubuntu@ip$ cd target/release/examples
ubuntu@ip$ ./falcon --prompt "who invented the lightbulb"

# Store models in existing S3 bucket "my-candle-binaries"
ubuntu@ip$ aws s3 cp quantized s3://my-candle-binaries

# Exit the SSH
ubuntu@ip$ exit

# Download binaries to run locally (assumes compatible local architecture)
$ cargo run bucket --name my-candle-binaries --action list
$ cargo run object --bucket my-candle-binaries --key falcon --action get
$ ./falcon --prompt "who invented the lightbulb"

# Stop your instance
$ cargo run instance --id <INSTANCE_ID> --action stop
Move Jenkins + Codepipeline binaries to EC2
Complete the Jenkins + CodePipeline tutorial to setup automated EC2 and S3 builds
# List your S3 buckets, EC2 instances
$ cargo run list --s3 --ec2

# List S3 build artifacts
$ cargo run bucket --name candle-cpu --action list
# Will look something like candle-cpu/BuildArtif/7pKxpR0

# Connect to EC2
$ cargo run instance --id <INSTANCE_ID> --action start
$ cargo run connect --id <INSTANCE_ID>

# Copy S3 artifact bucket to EC2
# Note: it is recommended to only have the latest build artifact in the bucket
ubuntu@ip$ aws s3 sync s3://candle-cpu .

# Unzip
ubuntu@ip$ mkdir my-binaries
ubuntu@ip$ unzip candle-cpu/BuildArtif/7pKxpR0 ./my-binaries

# Remove S3 tarball
ubuntu@ip$ rm -r candle-cpu

# Run models
ubuntu@ip$ cd my-binaries
ubuntu@ip$ ./falcon --prompt "who invented the lightbulb"

# Exit the SSH
ubuntu@ip$ exit

# Stop your instance
$ cargo run instance --id <INSTANCE_ID> --action stop
Azure Builds
Requirements
Recipes
Getting Started
- Hello, Azure! ~ Hello, Candle on Azure
- Azure spot runner setup ~ Setup the Spot Runner resource group on Azure prepare for the VM image build.
- Azure VM + Github Action Run the spot runner to build the binary and deploy the binary to Github release.
Hello, Candle on Azure.
Prerequisites
Install Azure ClI
$ curl -sL https://aka.ms/InstallAzureCLIDeb | sudo bash
Login in to Azure
$ az login

# if above not working run:
$ az login --use-device-code
# check your Azure account information
$ az account show

# if you have multiple accounts, you need to set the specific account you want to use:
$ az account set --subscription <subscription_ID>
- the
subscription IDis theidfrom result of az account show.
Azure spot runner with Github Action.
Using Ephemeral Infrastructure with Azure VMS as GitHub Action Runners to build Candle binary latter.
Requirements
-
Setup Azure Account and record the
subscription IDyou have from the setting. -
Create a Personal Access Token (PAT) record as
$GitHubPAT
Create an service principle with the following details:
- AppID
- password
- tenant information
Create an service principal by running:
$ az ad sp create-for-rbac -n "Name_of_Service_principal"
- This output contains all the infomation about your
AZURE_CREDENTIALS. Please copy & save it to your local in order to set up VM after we setup the Spot Runner.
The output includes credentials that you must protect. Be sure that you do not include these credentials in your code or check the credentials into your source control. For more information, see https://aka.ms/azadsp-cli
Create an Azure Resource Group
A resource group is a way to group services together so that you can keep track of them and delete them later with ease. Use the az CLI to accomplish this:
az group create --location eastus --name "<RESOURCE_GROUP_NAME>"
Keep that resource group name handy for other operations. In this repository the $<RESOURCE_GROUP_NAME> resource group is used throughout. Note the location as well. Make sure that the location (region) maps to the resources you want to create.
Create an Azure Key Vault
You will store your GitHub PAT here so that it can later be retrieved by the VM.
$ az keyvault create --name candel-vms --resource-group githubVM --location eastus
$ az keyvault secret set --vault-name candel-vms --name "GitHubPAT" --value $GITHUB_PAT
Replace $GITHUB_PAT with the value of the PAT created earlier
Assign an identity with permissions for Key Vault
Now that the key vault is created, you need to create an identity and then allow resources in the resource group to be able to access it. You must give this identity a name, in this case we use GitHubVMs. Note this name will be used in other steps.
$ az identity create --name GitHubVMs --resource-group githubVM --location eastus
Capture the Principal ID which will be used for the value for --object-id later. You can retrieve it again by using:
$ az identity show --name GitHubVMs --resource-group githubVM
Use the object id to set the policy, replace $OBJECT_ID with the one you found in the previous command:
$ az keyvault set-policy --name candel-vms --object-id <$BOJECT_ID> --secret-permissions get
Verify you can get the PAT with the following command:
az keyvault secret show --name "GitHubPAT" --vault-name candel-vms --query value -o tsv
Provide a role to VMs
Assign a role to the VMs so that they have enough permissions to write the image when getting created. Start by finding the principalId which will then be needed for the next step:
az identity show --name GitHubVMs --resource-group githubVM --query principalId
With the principalId you can assign it to the VMs now:
az role assignment create --assignee <principal_ID> --role Contributor --resource-group githubVM
Trigger the create image run
Now you are ready to create the image. Run it manually and make sure it works correctly. If succesful, an image will be created for you which you can query with the following command:
az image list --resource-group githubVM --output table
Using Github Action to build Candle image on Azure Spot Runner VM
Prerequisites
- A Github Account
- An Azure Account
- Finish setup Azure Spot Runner
Create Github Secrets
- In Github, go to your repository.
- Go to Settings in the navigation menu.
- Select Securigy > Secrets and variables > Actions.
- Select New Repository Secret
- Paste the entire Json output from the Azure CLI command into the github action secret's value field. Give the secret the name:
AZURE_CREDENTIALS. - Select Add secret.
Build your image
Structure Overview
- Azure-spot-runner
  - .github/workflow
    - create-image.yml
    - runner.yml
  - workflow-artifacts
    - cloud-init.txt
    - setup-image.sh
-
Use the Create-Image.yml file below to create a custom virtual machine image.
on: workflow_dispatch

jobs:
  job1:
    runs-on: ubuntu-latest
    name: Create Custom Linux Image
    steps:
    - name: Checkout
      uses: actions/checkout@v2

    - name: Login via Az module
      uses: azure/login@v1
      with:
        creds: ${{secrets.AZURE_CREDENTIALS}}

    - name: Build and Distribute Custom VM Image
      uses: azure/build-vm-image@v0
      with:
        resource-group-name: '<RESOURCE_GROUP_NAME>'
        location: '<RESOURCE_LOCATION>'
        managed-identity: '<AZURE-IDENTITY>'
        source-os-type: 'linux'
        vm-size: "Standard_D2s_v3"
        source-image-type: 'platformimage'
        source-image: Canonical:0001-com-ubuntu-server-jammy:22_04-lts-gen2:latest
        customizer-source: ${{ github.workspace }}/workflow-artifacts
        customizer-script: |
          ls -l /tmp/
          ls -l /tmp/workflow-artifacts
          sh /tmp/workflow-artifacts/setup-image.sh
-
You can modify the following information to your own secrets you build in azure-spot-runner
resource-group-name: '<RESOURCE_GROUP_NAME>'
location: '<RESOURCE_LOCATION>'
managed-identity: '<AZURE-IDENTITY>'
Replace the placeholders, where you created them in the Hello-azure.md,
You can also change the VM type (CPU & GPU) by changing
<vm-size>,<source-image-type>,<source-image>
-
You will also create an
setup-image.shbelow for the image build.#!/bin/bash # # Setup the runner to have the Azure CLI pre-installed as well as the Actions # Runner # Define a working directory WORK_DIR="/opt/actions-runner" # Install Azure CLI, should not use sudo curl -sL https://aka.ms/InstallAzureCLIDeb | bash # Create a folder mkdir -p $WORK_DIR && cd $WORK_DIR # Download the latest runner package curl -O -L https://github.com/actions/runner/releases/download/v2.310.2/actions-runner-linux-x64-2.310.2.tar.gz # Extract the installer tar xzf $WORK_DIR/actions-runner-linux-x64-2.310.2.tar.gz
Start your Runner and Build the Binary
-
After you create the VM image, now we can start run it by using the Runner.yml below:
on: workflow_dispatch jobs: job1: runs-on: ubuntu-latest name: Launch Runner steps: - name: Checkout uses: actions/checkout@v2 - name: Get GitHub Runner Registration Token run: | set -e RUNNER_TOKEN=$(curl -f -X POST \ -H "Authorization: token ${{ secrets.PAT }}" \ -H "Accept: application/vnd.github.v3+json" \ https://api.github.com/repos/<YOUR_REPO_LOCATION>/actions/runners/registration-token | grep token | cut -d '"' -f 4) echo $RUNNER_TOKEN if [ -z "$RUNNER_TOKEN" ]; then echo "Failed to retrieve the runner token." exit 1 fi echo "RUNNER_TOKEN=$RUNNER_TOKEN" >> $GITHUB_ENV env: PAT: ${{ secrets.PAT }} - name: Modify cloud-init.txt run: | set -e sed -i "2iRUNNER_TOKEN=$RUNNER_TOKEN" workflow-artifacts/cloud-init.txt if ! grep -q "RUNNER_TOKEN=$RUNNER_TOKEN" workflow-artifacts/cloud-init.txt; then echo "Modification with sed failed." exit 1 fi - name: Login via Az module uses: azure/login@v1 with: creds: ${{secrets.AZURE_CREDENTIALS}} - name: Find the latest image URI id: find_image uses: azure/CLI@v1 with: inlineScript: | IMAGE_URI=$(az image list --resource-group githubVM --query "[-1].id" --output tsv) echo "::set-output name=image_uri::$IMAGE_URI" - name: CREATE VM id: create_vm uses: azure/CLI@v1 with: inlineScript: | az vm create --resource-group githubVM --name "app-vm-${{ GITHUB.RUN_NUMBER }}" --admin-username "runner" --admin-password "${{ secrets.VM_PASSWORD }}" --location eastus \ --custom-data workflow-artifacts/cloud-init.txt \ --image "${{ steps.find_image.outputs.image_uri }}" \ --generate-ssh-keys # At the end of your CREATE VM step - name: Set VM Name Output run: echo "::set-output name=vm_name::app-vm-${{ GITHUB.RUN_NUMBER }}" id: vm_name -
You can add your customer code inside the
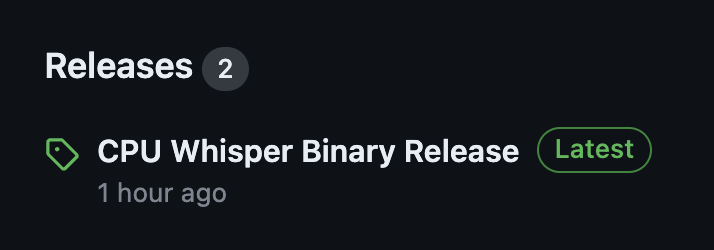
workflow-artifacts/cloud-init.txtbelow for specific need.#!/bin/bash # Define a working directory export HOME=/root WORK_DIR="/opt/actions-runner" # Start the runner chown -R runner $WORK_DIR su - runner -c "$WORK_DIR/config.sh --unattended --url https://github.com/nogibjj/candle_scott_Azure_vm --token $RUNNER_TOKEN" nohup su - runner -c "$WORK_DIR/run.sh" & # Install packages apt-get update apt-get install -y build-essential pkg-config libssl-dev protobuf-compiler jq git-lfs curl jq git lfs install # Install Rust curl --proto '=https' --tlsv1.2 -sSf https://sh.rustup.rs | sh -s -- -y export PATH="$HOME/.cargo/bin:$PATH" # Get the candle Repo git clone https://github.com/huggingface/candle.git /root/candle cd /root/candle # Build the model and depoly the binary into Github Release. if cargo build --example whisper --release; then FILE="/root/candle/target/release/examples/whisper" MIME_TYPE=$(file -b --mime-type "$FILE") TAG="v$(date +%Y%m%d%H%M%S)" RELEASE_NAME="CPU Whisper Binary Release" GITHUB_TOKEN="$GITHUB_TOKEN" # Token passed from GitHub Actions CREATE_RELEASE_RESPONSE=$(curl -X POST -H "Authorization: token $GITHUB_TOKEN" -H "Content-Type: application/json" -d "{\"tag_name\": \"$TAG\", \"name\": \"$RELEASE_NAME\"}" "https://api.github.com/repos/nogibjj/candle_scott_Azure_vm/releases") UPLOAD_URL=$(echo $CREATE_RELEASE_RESPONSE | jq -r .upload_url | sed "s/{?name,label}//") curl -X POST -H "Authorization: token $GITHUB_TOKEN" -H "Content-Type: $MIME_TYPE" --data-binary @"$FILE" "$UPLOAD_URL?name=$(basename "$FILE")" else echo "Cargo build failed." fiThe example code in cloud-init.txt is set up to build the candle whisper binary and deploy the binary into the Github release.
Note, after the runner build, it might takes up to 15 mins for this cpu VM to finish the work and deploy the whisper release in Github.
After the binary deploy to Github, you will find out the release file in your github repo.
Debugging on VM
You can check the log from Azure Portal:
- Go to the Azure Portal.
- Navigate to the "Virtual Machines" section.
- Find and select the VM you created (app-vm).
- Under the "Support + troubleshooting" section, find and click on "Serial console".
- The serial console will open in a new window. You might have to wait for a few moments as the console establishes a connection to the VM.