Tips on Learning Rust
Note, you can learn Rust for MLOps by taking this Duke Coursera course here: DevOps, DataOps, MLOps
Leveling Up with Rust via GitHub Copilot
Use GitHub ecosystem to "LEVEL UP" to a more powerful language in Rust.
Teaching MLOps at Scale (GitHub Universe 2022)
Preface
This book is for Cloud Computing for Data at Duke University in 2023 by Noah Gift. What currently keeps me busy is working as an Executive in Residence at the Duke MIDS (Data Science) and Duke AI Product Management program and as a consultant and author in Cloud Computing, Big Data, DevOps, and MLOps. The following visual resume is a good idea to show what I have worked on in my career. I am a Rust Fanatic.

Related Duke Coursera Content
- You can find many related Coursera Courses at https://www.coursera.org/instructor/noahgift
🔭 I'm currently working on or just finished the following things below:
MLOps (Specialization: 4 Courses)
Publisher: Coursera + Duke
Release Date: 1/1/2023
- DevOps, DataOps, MLOps
- MLOps Platforms: Amazon SageMaker and Azure ML
- Open Source Platforms for MLOps
- Python Essentials for MLOps
Foundations of Data Engineering (Specialization: 4 Courses)
Publisher: Coursera + Duke
Release Date: 2/1/2022

- Python, Bash, and SQL Essentials for Data Engineering Specialization
- Course1: Python and Pandas for Data Engineering
- Course2: Linux and Bash for Data Engineering
- Course3: Scripting with Python and SQL for Data Engineering
- Course4: Web Development and Command-Line Tools in Python for Data Engineering
AWS Certified Solutions Architect Professional exam (SAP-C01)
Publisher: Linkedin Learning
Release Date: January, 2021
- AWS Certified Solutions Architect - Professional (SAP-C01) Cert Prep: 1 Design for Organizational Complexity
- Microsoft Azure Data Engineering (DP-203): 2 Design and Develop Data Processing
- AWS Certified Solutions Architect - Professional (SAP-C01) Cert Prep: 2 Design for New Solutions
AWS w/ C#
Publisher: O'Reilly
Release Date: 2022 (Reinvent 2022 Target)
Working with O'Reilly and AWS to write a book on building solutions on AWS with C#/.NET 6.

Practical MLOps
Publisher: O'Reilly
Release Date: 2021
Cloud Computing (Specialization: 4 Courses)
Publisher: Coursera + Duke
Release Date: 4/1/2021
Building Cloud Computing Solutions at Scale Specialization Launch Your Career in Cloud Computing. Master strategies and tools to become proficient in developing data science and machine learning (MLOps) solutions in the Cloud
What You Will Learn
- Build websites involving serverless technology and virtual machines, using the best practices of DevOps
- Apply Machine Learning Engineering to build a Flask web application that serves out Machine Learning predictions
- Create Microservices using technologies like Flask and Kubernetes that are continuously deployed to a Cloud platform: AWS, Azure or GCP
Courses in Specialization

- Take the Specialization
- Cloud Computing Foundations
- Cloud Virtualization, Containers and APIs
- Cloud Data Engineering
- Cloud Machine Learning Engineering and MLOps
📫 How to reach me:
- Linkedin: https://www.linkedin.com/in/noahgift/
- Web: https://noahgift.com
- Pragmatic AI Labs: https://paiml.com
- Subscribe to the Pragmatic AI Labs YouTube Channel (New Content Weekly)
⚡ Fun facts: I was a bouncer in college with former UFC Champion Chuck Liddell. Early in my career, I worked on the movie Avatar while living in New Zealand. I used to play basketball with Adam Sandler at lunch when I worked at Sony Imageworks in Los Angeles, CA.
Chapter 1-Week 1 (Getting Started With Rust for Cloud, Data and MLOps)
(btw, yes, I made this image using Rust)

Demo Video of building a Command-Line Tool in Rust
Graduate Cloud Computing for Data w/ Rust first approach
- Heuristic: Rust if you can, Python if you must
- Refer to these resources when needed:
- Online Book Cloud Computing for Data
- Developing on AWS with C#
- Syllabus
- Project
- New Rust Guide
- GitHub Template Rust New Projects
- Rust MLOps Template
- Building Cloud Computing Solutions at Scale Specialization You should refer to this guide often, and this Rust tutorial supplements it
Key Goals in Semester
- ~1, 500 Rust projects = 100 Students * 15 Weeks
- Build Resume worthy projects
- Projects should be runnable with minimal instructions as command-line tools or microservices deployed to the cloud
How to Accomplish Goals
Two different demo channels
- Weekly Learning Demo: Projects can take 10-60 minutes on average to complete (Text only explanation, screencast optional). You must show the code via the link and explain it via
README.md. - Weekly Project Progress Demo: Demo via screencast, required. The demo should be 3-7 minutes.
Two Different Portfolio Styles
Weekly Learning Repo Spec
- Weekly Learning Repo Should Mimic This Style: https://github.com/nogibjj/rust-mlops-template, as in many tiny projects get automatically built because of the
Makefile: https://github.com/nogibjj/rust-mlops-template/blob/main/Makefile
Big Projects Repo Spec
Each "big" project should have a dedicated repo for it; a good example is the following repo: https://github.com/noahgift/rdedupe. Please also follow these additional guidelines:
- Each repo needs a well-written README.md with an architectural diagram
- Each repo needs a GitHub release (see example here: https://github.com/rust-lang/mdBook/releases) where a person can run your binary.
- Each repo needs a containerized version of your project where they can build the project and do a
docker pullto a public container registry like Docker Hub: Docker Hub - I would encourage advanced students to build a library for one of your projects and submit it to crates.io: https://crates.io if it benefits the Rust community (Don't publish junk)
- Each repo needs to publish a benchmark showing performance. Advanced students may want to consider benchmarking your Rust project against a Python project
- You should default toward building command-line tools with Clap: https://crates.io/crates/clap and web applications with Actix: https://crates.io/crates/actix, unless you have a compelling reason to switch to a new framework.
- Your repo should include continuous integration steps: test, format, lint, publish (deploy as a binary or deploy as a Microservice).
- Microservices should include logging; see rust-mlops-template for example.
- A good starting point is this Rust new project template: https://github.com/noahgift/rust-new-project-template
- Each project should include a reproducible GitHub .devcontainer workflow; see rust-mops-template for example.
Structure Each Week
- 3:30-4:45 - Teach
- 4:45-5:00 - Break
- 5:00-6:00 - Teach
Projects
Team Final Project (Team Size: 3-4): Rust MLOps Microservice
- Build an end-to-end MLOps solution that invokes a model in a cloud platform using only Rust technology (i.e., Pure Rust Code). Examples could include the PyTorch model, or Hugging Face model, or any model packaged with a Microservice. (see the guide above about specs)
Individual Project #1: Rust CLI
- Build a useful command-line tool in data engineering or machine learning engineering. (see the guide above about specs)
Individual Project #2: Kubernetes (or similar) Microservice in Rust
- Build a functional web microservice in data engineering or machine learning engineering. (see the guide above about specs)
Individual Project #3: Interact with Big Data in Rust
- Build a functional web microservice or CLI in data engineering or machine learning engineering that uses a large data platform. (see the guide above about specs)
Individual Project #4: Serverless Data Engineering Pipeline with Rust
- Build a useful, serverless application in Rust. (see the guide above about specs) Also see https://noahgift.github.io/cloud-data-analysis-at-scale/projects#project-4.
Optional Advanced Individual Projects
For advanced students, feel free to substitute one of the projects for these domains:
-
Web Assembly Rust: Follow the above guidelines, but port your deploy target to Rust Web Assembly. For example, you were Hugging Face in the browser.
-
Build an MLOps platform in Rust that could be a commercial solution (just a prototype)
-
Build a Rust Game that uses MLOps and runs in the cloud
-
(Or something else that challenges you)
Onboarding Day 1
- GitHub Codespaces with Copilot
- AWS Learner Labs
- Azure Free Credits
- More TBD (AWS Credits, etc.)
Getting Started with GitHub Codespaces for Rust
rust-new-project-template
All Rust projects can follow this pattern:
- Create a new repo using Rust New Project Template: https://github.com/noahgift/rust-new-project-template
- Create a new Codespace and use it
- Use
main.rsto call the handle CLI andlib.rsto handle logic and importclapinCargo.tomlas shown in this project. - Use `cargo init --name 'hello' or whatever you want to call your project.
- Put your "ideas" in as comments in Rust to seed GitHub Copilot, i.e //build anadd function
- Run
make formati.e.cargo format - Run
make linti.e.cargo clippy --quiet - Run project:
cargo run -- --help - Push your changes to allow GitHub Actions to:
formatcheck,lintcheck, and other actions like binary deploy.
This pattern is a new emerging pattern and is ideal for systems programming in Rust.

Repo example here: https://github.com/nogibjj/hello-rust
Reproduce
A good starting point for a new Rust project
To run: cargo run -- marco --name "Marco"
Be careful to use the NAME of the project in the Cargo.toml to call lib.rs as in:
[package]
name = "hello"
For example, see the name hello invoked alongside marco_polo, which is in lib.rs.
lib.rs code:
#![allow(unused)]
fn main() {
/* A Marco Polo game. */

/* Accepts a string with a name.
If the name is "Marco", returns "Polo".
If the name is "any other value", it returns "Marco".
*/
pub fn marco_polo(name: &str) -> String {
    if name == "Marco" {
        "Polo".to_string()
    } else {
        "Marco".to_string()
    }
}
}
main.rs code:
fn main() {
    let args = Cli::parse();
    match args.command {
        Some(Commands::Marco { name }) => {
            println!("{}", hello::marco_polo(&name));
        }
        None => println!("No command was used"),
    }
}
References
- Cargo Book
- The Rust Programming Language Official Tutorial
- Comprehensive Rust Google Tutorial
- rust-cli-template
- Command-Line Rust
- Switching to Rust from Python (Live Rough Draft Series)
Chapter 2-Week 2 (Up and Running with Cloud Computing)
Goal: Up and running with Cloud Computing technology
Part 1: Getting Started with Cloud Computing Foundations
High Level Summary
- Three ways to interact with AWS: Console, Terminal and SDK (Rust, C#, Python, etc)
Demo
- Demo console, cli, sdk
Setup Rust in AWS Cloud 9 Direct Link
Related videos
Part 2: Developing Effective Technical Communication
- Remote work isn't going away ability to work async is critical to success
- Some tips on Effective Technical Communication
High Level Summary
If someone cannot reproduce what you did, why would they hire you???
- Build 100% reproduceable code: If not automated it is broken
- Automatically tested via GitHub
- Automatically linted via GitHub
- Automatically formatted (check for compliance) via GitHub
- Automatically deployed via GitHub (packages, containers, Microservice)
- Automatically interactive (people can extend) with GitHub .devcontainers
- Incredible
README.mdthat shows clearly what you are doing and an architectural diagram. - Optional video demo 3-7 minutes (that shows what you did)
- Include portfolio
- Consider using
rustmdbook (what I built this tutorial in) for an extra-special touch.
Part 3: Using AWS Cloud and Azure Cloud with SDK
Demo
AWS Lambda Rust Marco Polo
main.rs direct link.
use lambda_runtime::{run, service_fn, Error, LambdaEvent};
use serde::{Deserialize, Serialize};

#[derive(Deserialize)]
struct Request {
    name: String,
}

#[derive(Serialize)]
struct Response {
    req_id: String,
    msg: String,
}

async fn function_handler(event: LambdaEvent<Request>) -> Result<Response, Error> {
    // Extract some useful info from the request
    let name = event.payload.name;
    let logic = match name.as_str() {
        "Marco" => "Polo",
        _ => "Who?",
    };

    // Prepare the response
    let resp = Response {
        req_id: event.context.request_id,
        msg: format!("{} says {}", name, logic),
    };

    // Return `Response` (it will be serialized to JSON automatically by the runtime)
    Ok(resp)
}

#[tokio::main]
async fn main() -> Result<(), Error> {
    tracing_subscriber::fmt()
        .with_max_level(tracing::Level::INFO)
        // disable printing the name of the module in every log line.
        .with_target(false)
        // disabling time is handy because CloudWatch will add the ingestion time.
        .without_time()
        .init();

    run(service_fn(function_handler)).await
}
Cargo.toml direct link
[package]
name = "marco-polo-lambda"
version = "0.1.0"
edition = "2021"

# Starting in Rust 1.62 you can use `cargo add` to add dependencies
# to your project.
#
# If you're using an older Rust version,
# download cargo-edit(https://github.com/killercup/cargo-edit#installation)
# to install the `add` subcommand.
#
# Running `cargo add DEPENDENCY_NAME` will
# add the latest version of a dependency to the list,
# and it will keep the alphabetic ordering for you.

[dependencies]

lambda_runtime = "0.7"
serde = "1.0.136"
tokio = { version = "1", features = ["macros"] }
tracing = { version = "0.1", features = ["log"] }
tracing-subscriber = { version = "0.3", default-features = false, features = ["fmt"] }
Steps to run
make formatto format codemake lintto lintmake release-armto build for arm which is:cargo lambda build --release --arm64make deploywhich is thiscargo lambda deploy
(.venv) @noahgift ➜ /workspaces/rust-mlops-template/marco-polo-lambda (main) $ make invoke
cargo lambda invoke --remote \
                --data-ascii '{"name": "Marco"}' \
                --output-format json \
                marco-polo-lambda
{
  "msg": "Marco says Polo",
  "req_id": "abc67e2b-a3aa-47fa-98fb-d07eb627577e"
}
AWS S3 Account Summarizer with Rust
lib.rs [direct link]
#![allow(unused)]
fn main() {
//Information about the AWS S3 service
use aws_config::meta::region::RegionProviderChain;
use aws_sdk_s3::{Client, Error};

// Create a new AWS S3 client
pub async fn client() -> Result<Client, Error> {
    let region_provider = RegionProviderChain::first_try(None)
        .or_default_provider()
        .or_else("us-east-1");
    let shared_config = aws_config::from_env().region(region_provider).load().await;
    let client = Client::new(&shared_config);
    Ok(client)
}

/* return a list of all buckets in an AWS S3 account
*/

pub async fn list_buckets(client: &Client) -> Result<Vec<String>, Error> {
    //create vector to store bucket names
    let mut bucket_names: Vec<String> = Vec::new();
    let resp = client.list_buckets().send().await?;
    let buckets = resp.buckets().unwrap_or_default();
    //store bucket names in vector
    for bucket in buckets {
        bucket_names.push(bucket.name().unwrap().to_string());
    }
    Ok(bucket_names)
}

// Get the size of an AWS S3 bucket by summing all the objects in the bucket
// return the size in bytes
async fn bucket_size(client: &Client, bucket: &str) -> Result<i64, Error> {
    let resp = client.list_objects_v2().bucket(bucket).send().await?;
    let contents = resp.contents().unwrap_or_default();
    //store in a vector
    let mut sizes: Vec<i64> = Vec::new();
    for object in contents {
        sizes.push(object.size());
    }
    let total_size: i64 = sizes.iter().sum();
    println!("Total size of bucket {} is {} bytes", bucket, total_size);
    Ok(total_size)
}

/* Use list_buckets to get a list of all buckets in an AWS S3 account
return a vector of all bucket sizes.
If there is an error continue to the next bucket only print if verbose is true
Return the vector
*/
pub async fn list_bucket_sizes(client: &Client, verbose: Option<bool>) -> Result<Vec<i64>, Error> {
    let verbose = verbose.unwrap_or(false);
    let buckets = list_buckets(client).await.unwrap();
    let mut bucket_sizes: Vec<i64> = Vec::new();
    for bucket in buckets {
        match bucket_size(client, &bucket).await {
            Ok(size) => bucket_sizes.push(size),
            Err(e) => {
                if verbose {
                    println!("Error: {}", e);
                }
            }
        }
    }
    Ok(bucket_sizes)
}
}
main.rs [direct link]
(/*A Command-line tool to Interrogate AWS S3.
Determines information about AWS S3 buckets and objects.
*/
use clap::Parser;
use humansize::{format_size, DECIMAL};

#[derive(Parser)]
//add extended help
#[clap(
    version = "1.0",
    author = "Noah Gift",
    about = "Finds out information about AWS S3",
    after_help = "Example: awsmetas3 account-size"
)]
struct Cli {
    #[clap(subcommand)]
    command: Option<Commands>,
}

#[derive(Parser)]
enum Commands {
    Buckets {},
    AccountSize {
        #[clap(short, long)]
        verbose: Option<bool>,
    },
}

#[tokio::main]
async fn main() {
    let args = Cli::parse();
    let client = awsmetas3::client().await.unwrap();
    match args.command {
        Some(Commands::Buckets {}) => {
            let buckets = awsmetas3::list_buckets(&client).await.unwrap();
            //print count of buckets
            println!("Found {} buckets", buckets.len());
            println!("Buckets: {:?}", buckets);
        }
        /*print total size of all buckets in human readable format
        Use list_bucket_sizes to get a list of all buckets in an AWS S3 account
        */
        Some(Commands::AccountSize { verbose }) => {
            let bucket_sizes = awsmetas3::list_bucket_sizes(&client, verbose)
                .await
                .unwrap();
            let total_size: i64 = bucket_sizes.iter().sum();
            println!(
                "Total size of all buckets is {}",
                format_size(total_size as u64, DECIMAL)
            );
        }
        None => println!("No command specified"),
    }
})
Cargo.toml direct link
[package]
name = "awsmetas3"
version = "0.1.0"
edition = "2021"

# See more keys and their definitions at https://doc.rust-lang.org/cargo/reference/manifest.html

[dependencies]
aws-config = "0.52.0"
aws-sdk-s3 = "0.22.0"
tokio = { version = "1", features = ["full"] }
clap = {version="4.0.32", features=["derive"]}
humansize = "2.0.0"
Related videos
References
- Developing on AWS with C# Free PDF O'Reilly book
- 52 Weeks of AWS-The Complete Series
- Microsoft Azure Fundamentals (AZ-900) Certification
- A Graduate Level Three to Five Week Bootcamp on AWS. Go from ZERO to FIVE Certifications.
- Duke Coursera Cloud Computing Foundations
Chapter 3 - Week 3: Virtualization and Containers
Continuous Delivery of Rust Actix to ECR and AWS App Runner
Chapter 4 - Week 4: Containerized Rust
- Refer to Web Applications and Command-Line Tools for Data Engineering with a specific focus on Week 3: Python (and .NET) Microservices and Week 4: Python Packaging and Command Line Tools and the lessons focused on containerization.
Building A Tiny Rust Container for a Command-Line Tool
Containerized Actix Microservice
Dockerfile
FROM rust:latest as builder
ENV APP webdocker
WORKDIR /usr/src/$APP
COPY . .
RUN cargo install --path .

FROM debian:buster-slim
RUN apt-get update && rm -rf /var/lib/apt/lists/*
COPY --from=builder /usr/local/cargo/bin/$APP /usr/local/bin/$APP
#export this actix web service to port 8080 and 0.0.0.0
EXPOSE 8080
CMD ["webdocker"]
Cargo.toml
[package]
name = "webdocker"
version = "0.1.0"
edition = "2021"

# See more keys and their definitions at https://doc.rust-lang.org/cargo/reference/manifest.html

[dependencies]
actix-web = "4"
rand = "0.8"
lib.rs
#![allow(unused)]
fn main() {
/*A library that returns back random fruit */

use rand::Rng;

//create an const array of 10 fruits
pub const FRUITS: [&str; 10] = [
    "Apple",
    "Banana",
    "Orange",
    "Pineapple",
    "Strawberry",
    "Watermelon",
    "Grapes",
    "Mango",
    "Papaya",
    "Kiwi",
];

//create a function that returns a random fruit
pub fn random_fruit() -> &'static str {
    let mut rng = rand::thread_rng();
    let random_index = rng.gen_range(0..FRUITS.len());
    FRUITS[random_index]
}
}
main.rs
/*An actix Microservice that has multiple routes:
A.  / that turns a hello world
B. /fruit that returns a random fruit
C. /health that returns a 200 status code
D. /version that returns the version of the service
*/

use actix_web::{get, App, HttpResponse, HttpServer, Responder};
//import the random fruit function from the lib.rs file
use webdocker::random_fruit;

//create a function that returns a hello world
#[get("/")]
async fn hello() -> impl Responder {
    HttpResponse::Ok().body("Hello World Random Fruit!")
}

//create a function that returns a random fruit
#[get("/fruit")]
async fn fruit() -> impl Responder {
    //print the random fruit
    println!("Random Fruit: {}", random_fruit());
    HttpResponse::Ok().body(random_fruit())
}

//create a function that returns a 200 status code
#[get("/health")]
async fn health() -> impl Responder {
    HttpResponse::Ok()
}

//create a function that returns the version of the service
#[get("/version")]
async fn version() -> impl Responder {
    //print the version of the service
    println!("Version: {}", env!("CARGO_PKG_VERSION"));
    HttpResponse::Ok().body(env!("CARGO_PKG_VERSION"))
}

#[actix_web::main]
async fn main() -> std::io::Result<()> {
    //add a print message to the console that the service is running
    println!("Running the service");
    HttpServer::new(|| {
        App::new()
            .service(hello)
            .service(fruit)
            .service(health)
            .service(version)
    })
    .bind("0.0.0.0:8080")?
    .run()
    .await
}
Deployed to AWS App Runner via ECR

- cd into
webdocker - build and run container (can do via
Makefile) or
docker build -t fruit .
docker run -it --rm -p 8080:8080 fruit
- push to ECR
- Tell AWS App Runner to autodeploy
Related Demos
Chapter 5 - Week 5: Distributed Computing and Concurrency (True Threads with Rust)

Chapter 6 - Week 6: Distributed Computing
- Challenges and Opportunities in Distributed Computing
- Cover [GPU in Rust Examples] via PyTorch bindings for Rust + Stable Diffusion.
Chapter 7 - Week 7: Serverless
AWS Lambda with Rust
- Fast inference and low memory


Part 2: Guest Maxime DAVID
Chapter 8-More Serverless
Hour 1: Rust with Azure Functions
- Guest Lecture Alfredo Deza
- Deploy Rust on Azure Functions
Hour2: Step Functions with Rust
Marco, Polo Rust Step Function
Code here: https://github.com/nogibjj/rust-mlops-template/blob/main/step-functions-rust/README.md
- create new marco polo lambda
cargo lambda new rust-marco
Then build, deploy and invoke: make release make deploy and make invoke:
(.venv) @noahgift ➜ /workspaces/rust-mlops-template/step-functions-rust/rust-marco (main) $ make invoke
cargo lambda invoke --remote \
                --data-ascii '{"name": "Marco"}' \
                --output-format json \
                rust-marco
{
  "payload": "Polo",
  "req_id": "20de1794-1055-4731-9488-7c9217ad195d"
}
- create new rust polo lambda
cargo lambda new rust-polo


GCP Cloud Functions
Chapter 9: AI Pair Assisted Programming and Big Data Storage
Mini-Lecture A: Using GitHub Copilot CLI
tldr: these are the commands
#!/usr/bin/env bash

#some setup stuff for the dev environment
#install nodejs
curl -fsSL https://deb.nodesource.com/setup_19.x | sudo -E bash - &&\
sudo apt-get install -y nodejs

#install GitHub Copilot CLI
npm install -g @githubnext/github-copilot-cli

#authenticate with GitHub Copilot
github-copilot-cli auth

#Upgrade
#npm install -g @githubnext/github-copilot-cli
Suggestion: Try out commands via ?? and put them into a cmd.sh so you can save both prompt and command
Here is an example of a cmd.sh
### GitHub Copilot Commands
## Prompt: ?? find all large rust target folders and get size and location
## CMD:  find . -name "target" -type d -exec du -sh {} \;

## Prompt:  ?? delete all rust build directories to save space
## CMD: find . -name "target" -type d -exec rm -rf {} \;
Mini-Lecture B: Building Chat Bot with OpenAI while Using ChatGPT4 as an AI Pair Programming Assistant
In this innovative project, we demonstrate the power of AI-driven pair programming tools, such as ChatGPT-4, OpenAI, and GitHub Copilot, by creating a fully-functional chatbot using the Rust programming language. The chatbot connects to the OpenAI API to provide intelligent, dynamic responses to user input. Throughout the development process, ChatGPT-4 assists with code refactoring and optimization, resulting in a high-quality, production-ready chatbot. This project showcases the remarkable capabilities of AI in augmenting human programming skills and improving code quality.
Here's the output of the tree command, displaying the project structure:
.
├── Cargo.lock
├── Cargo.toml
├── src
│   ├── chatbot.rs
│   ├── lib.rs
│   └── main.rs
└── tests
    └── test.rs
This project consists of the following main components:
Cargo.lockandCargo.toml: Rust's package manager files containing dependencies and metadata.src: The source code directory containing the main application and library files.chatbot.rs: The file containing the chatbot logic, including functions for user input, API calls, and AI response handling.lib.rs: The file exposing the chatbot module and its contents, as well as the chat loop function.main.rs: The main entry point of the application, initializing the environment and invoking the chat loop function.
tests: The directory containing test files.test.rs: The file with test cases for the chatbot functions.
main.rs
use chatbot::chatbot::run_chat_loop;
use reqwest::Client;

use std::env;

#[tokio::main]
async fn main() -> Result<(), reqwest::Error> {
    let client = Client::new();

    // Use env variable OPENAI_API_KEY
    let api_key = env::var("OPENAI_API_KEY").expect("OPENAI_API_KEY must be set");
    let url = "https://api.openai.com/v1/completions";

    run_chat_loop(&client, &api_key, url).await?;

    Ok(())
}
lib.rs
#![allow(unused)]
fn main() {
pub mod chatbot;
}
chatbot.rs
#![allow(unused)]
fn main() {
use reqwest::{header, Client};
use serde_json::json;
use serde_json::Value;
use std::io;
use std::io::Write;

pub async fn run_chat_loop(
    client: &Client,
    api_key: &str,
    url: &str,
) -> Result<(), reqwest::Error> {
    let mut conversation = String::from("The following is a conversation with an AI assistant. The assistant is helpful, creative, clever, and very friendly.\n");

    loop {
        print!("Human: ");
        io::stdout().flush().unwrap();

        let user_input = read_user_input();

        if user_input.to_lowercase() == "quit" || user_input.to_lowercase() == "exit" {
            break;
        }

        conversation.push_str("Human: ");
        conversation.push_str(&user_input);
        conversation.push_str("\nAI: ");

        let json = json!({
            "model": "text-davinci-003",
            "prompt": conversation,
            "temperature": 0.9,
            "max_tokens": 150,
            "top_p": 1.0,
            "frequency_penalty": 0.0,
            "presence_penalty": 0.6,
            "stop": [" Human:", " AI:"]
        });

        let body = call_api(client, api_key, url, json).await?;
        let ai_response = get_ai_response(&body);

        println!("AI: {}", ai_response);

        conversation.push_str(ai_response);
        conversation.push('\n');
    }

    Ok(())
}

pub async fn call_api(
    client: &Client,
    api_key: &str,
    url: &str,
    json: serde_json::Value,
) -> Result<Value, reqwest::Error> {
    let response = client
        .post(url)
        .header(header::AUTHORIZATION, format!("Bearer {}", api_key))
        .header(header::CONTENT_TYPE, "application/json")
        .json(&json)
        .send()
        .await?;

    let body: Value = response.json().await?;
    Ok(body)
}

pub fn get_ai_response(body: &Value) -> &str {
    body["choices"][0]["text"].as_str().unwrap().trim()
}

pub fn read_user_input() -> String {
    let mut user_input = String::new();
    io::stdin().read_line(&mut user_input).unwrap();
    user_input.trim().to_string()
}

}
tests/test.rs
#![allow(unused)]
fn main() {
use chatbot::chatbot::get_ai_response;
use serde_json::json;

#[test]
fn test_get_ai_response() {
    let body = json!({
        "choices": [
            {
                "text": " Hello! How can I help you today?\n"
            }
        ]
    });

    let response = get_ai_response(&body);
    assert_eq!(response, "Hello! How can I help you today?");
}
}
Mini-Lecture C: Using Azure Databricks
FAQ
There are two many resources; what should I use?
The primary resource for this course is Building Cloud Computing Solutions at Scale Specialization, and it extensively covers the most important concepts. You can work through this course as you attend class.
The secondary resources are this "live JIT (Just in Time) book on Rust. In the real world, you will be overwhelmed with information, and the best approach to using this information is to develop a heuristic. A good heuristic to master software engineering is building projects daily and making many mistakes weekly. When you are stuck, refer to a resource. Doing is much better than reading.
What can I do to get the most out of this class?
Try to code almost every single day for at least one hour. Use GitHub Copilot + continuous integration tools (Format/Lint/Compile/Test/Run) to understand how to build and deploy working software. The more cycles of building code while using these tools, the better you will get at real-world software engineering. There is no substitute for daily practice; you must code every day or almost every day.
It would be best if you also coded using the toolchain of modern tools that build quality software since jobs in the real world do care about code quality. Suppose you are not using automated quality control tools like formatting and linting locally and in the build system automatically to deploy binaries or microservices. In that case, you won't learn how to engage as a professional software engineer fully.

Rust Project Demos
Microservices Examples
Leveling up with Rust via Cargo to build a Web Microservice Actix
Project Ideas
Suggestions for a Cloud Computing Class at an Elite University Final Project in Rust
-
Design and implementation of a scalable cloud-based web application using Rust and the Rocket framework. Start with this example code: Rocket
-
Development of a multi-threaded, cloud-based image processing application in Rust using the Tokio framework. Start with this example code: Tokio
-
Creation of a cloud-based storage solution using Rust and the Sled database. Start with this example code: Sled
-
Building a cloud-based microservice architecture using Rust and the Actix framework. Start with this example code: Actix
-
An implementation of a cloud-based real-time data streaming platform using Rust and the Apache Kafka library. Start with this example code: rust-rdkafka
-
Development of a cloud-based serverless application using Rust and the OpenFaaS framework. Start with this example code: faas-rust
-
Design and implementation of a cloud-based IoT solution using Rust and the MQTT protocol. Start with this example code: paho.mqtt.rust
-
Creation of a cloud-based blockchain application using Rust and the Substrate framework. Start with this example code: Substrate
-
Building a cloud-based, multi-node distributed system using Rust and the Raft consensus algorithm. Start with this example code: raft-rs
-
Development of a cloud-based, real-time chat application using Rust and the WebSockets library. Start with this example code: tungstenite-rs
Guest Lectures
Derek Wales
- Title: Product Manager Dell
- Topic: Virtualization
- Date: 02/01/2023
- https://www.linkedin.com/in/derek-wales/
Resources:
Thomas Dohmke
- Title: CEO GitHub
- Topic: GitHub Copilot
- Date: 03/22/2023
- Linkedin: https://www.linkedin.com/in/ashtom
- Key Talk YouTube Video-Open-Source Values
Maxime David
- Title: Software Engineering @DataDog
- Topic: Rust for AWS Lambda
- Date: 3/01
- GitHub: https://github.com/maxday
- YouTube: https://www.youtube.com/@maxday_coding
- Key Talk YouTube Video-Live Stream Discussion Using Rust
- Podcast
- Enterprise MLOps Interviews
- Slides on Rust for AWS Lambda
Alfredo Deza
- Title: Author, Olympian, Adjunct Professor at Duke, Senior Cloud Advocate @Microsoft
- Topic: Rust with ONNX, Azure, OpenAI, Binary Deploy via GitHub Actions
- Date: Week of 3/22-24, at 5pm
- Linkedin: https://www.linkedin.com/in/alfredodeza/
Ken Youens-Clark
- Title: O'Reilly Author Command-Line Rust
- Buy Book-Command-Line Rust
- Date: Feb. 15th
- Additional Links:
Denny Lee
- Sr. Staff Developer Advocate @Databricks
- Date: April, 5th @4pm.
Matthew Powers
- Developer Advocate @Databricks
- Linked
- Date: April, 5th @5pm.
Brian Tarbox
- Linkedin: https://www.linkedin.com/in/briantarbox/
- Date: TBD
- AWS Lambda for Alexa Guru
Sustainability
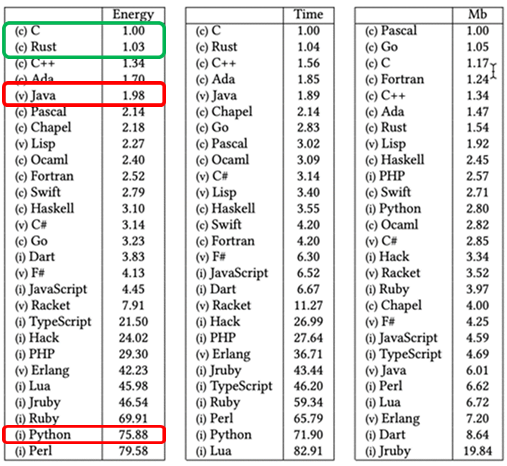
In the category of "Why Rust", this article from AWS nails just about every reason. In summary:
- Rust uses at least 50% less energy than languages like Python.
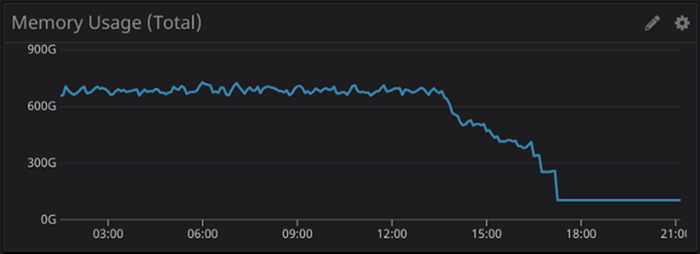
- Rust can reduce up to 75% CPU time from languages like Python, Ruby, and Javascript.
- Rust can reduce up to 95% memory usage from languages like Python, Ruby, and Javascript.